The Ruby Tutorial that I wish I had
I've moved to a new team recently. Some of the infrastructure definitions were written in Ruby. Ruby isn't a language I'm familiar with but I know a handful of programming languages, including Python, so I thought it would be trivial to pick up. I was very wrong.
Whenever I read Ruby, I felt lost. I genuinely had no idea how to interpret most of the program I was looking at. The code snippets just looked magical to me. I found it even more confusing than C++, which I had been programming for the last 2 years and has its own reputation for complexity.
I spent several frustrating nights studying to get to a point where I could understand relatively simple Ruby code. I quickly went through the official docs, starting with To Ruby from Python and combed through the FAQ. Still I felt I didn't really understand the language. I couldn't find answers to basic things like when I can/cannot omit brackets when calling a method.
I don't want other experienced programmers to go through the frustration I had so I want to share what I've learned to help others get started with Ruby. Here's a tutorial that I would have found useful 2 weeks ago.
Since it's a long collection, here's the table of contents for your convenience:
- Ruby is a lot more Object-Oriented
- Fun with Modules
- Diversity of Method definition/call Syntax
- Syntactic Sugar for Setters
- Blocks
- Procs
- yield
- procs
- Percent Strings
- 3 Ways to Write a Hash
- instance_eval for that Magic DSL look
- Conclusion
Ruby is a lot more object-oriented
Ruby is more object-oriented than many other mainstream programming languages. For example, in Ruby, it is a lot more idiomatic to use methods attached to basic classes like Integer, rather than to use a free function. Take a look at how to count from 0 to 4.
5.times {|x| puts x}
Compare this to what I'd do in Python:
for x in range(5): print(x)
As far as I can tell, there is no obvious distinction between primitives and objects. Java has a fairly strict division across the two types, like how an int doesn't have any methods. In Python, built-in types like int are a bit more object-like.
1.__add__(2)   # this is SyntaxError
(1).__add__(2) # This is OK - 3
The Python built-ins are still special in a sense that they cannot be overridden.
>>> int.__add__ = lambda x, y: y
Traceback (most recent call last):
  File "", line 1, in
TypeError: can't set attributes of built-in/extension type 'int'
In Ruby, extending/overriding core classes is possible. The following code adds a method named add1 to Integer.
# in Ruby, this adds the following to the existing Integer definition.
class Integer
    def add1
        self + 1
    end
end

puts 2.add1 # prints 3
I'll leave it up to you to decide if it's a good thing or not 😉
In addition, there is no free function. That's just like Java, but you can define methods without a function. So where do they go? The answer is that it's attached to the class Object. You can inspect this yourself by running the following script:
def test; 42 end
puts method(:test).owner
# output: Object
Since every object in Ruby derives from Object, does this mean these functions are effectively global functions that are in every single class? The answer is yes. Check out the following example:
class B
  def answer
    puts "fun_in_main owned by #{method(:fun_in_main).owner}"
    fun_in_main
  end
end

def fun_in_main; 42 end
puts B.new.answer

# output
fun_in_main owned by Object
42
Fun with Modules
Ruby modules have two purposes. First, they can organize classes and methods into a namespace. In that respect, it's a lot like a Python package. Interestingly, Ruby modules are also used as a template for mixing in methods into a class. What I found confusing about this was that a module itself is the target of mixin, rather than a class in the module. To me it makes more senes to have a class mix into another class, rather than have a module mix into a class. Then I realized that the syntax for creating "free functions" in a module looked like a static class method. So I started wondering, are modules and classes the same? To investigate this, I ran the following experiment:
module Quacks
    # effectively a free function under Quacks namespace
    def self.static_quack
        puts "static_quack"
    end
    # for use as a mixin
    def quack
        puts "quack"
    end
end

class Duck
    include Quacks # now I can use all methods from Quacks
end

Quacks.static_quack # => prints static_quack
Duck.new.quack # => prints quack
In this code snippet, static_quack is a static method to the module, so the module is being used to emulate a free function. On the other hand, quack is meant to be mixed into the class Duck when include Quacks run.
irb(main):009:0> Quacks.new
Traceback (most recent call last):
        2: from /usr/bin/irb:11:in `'
        1: from (irb):82
NoMethodError (undefined method `new' for Quacks:Module)
It's not quite a class since it doesn't have the new method. But it does kind of look like a class because it has all the class-like methods:
irb(main):010:0> Quacks.instance_methods
=> [:quack]
irb(main):011:0> Quacks.methods false
=> [:static_quack]
Answer to my question: they are similar but not the same thing.
Diversity of Method definition/call Syntax
In Ruby, there is no attribute/method distinction. Everything is a method by default, but they do look like attributes. That's good for encapsulation but I found this one of the most confusing part of the Ruby syntax. Consider the following class:
class Sample
    def x
        3
    end
end
The class Sample has a method/attribute named x, so you can access it like the following:
s = Sample.new
puts s.x()
But you can also call x like this:
puts s.x
For any zero-argument method, you may omit the normal function call braces.
The next question I had was, how would I get the reference to the method itself, if the method name invokes the method right away? The answer is to use the method method and pass in the name of the method as a symbol.
m = s.method(:x)
m.call # calls s.x
Then this method call be called using call() like in the example. Note this method is bound to the object by default, which can be retrieved by calling s.receiver.
This terse method call syntax also extends to single argument calls. In the following example, f is a method that takes a single argument and adds 1 to it.
class AddOne
    def f x
        x + 1
    end
end
But it's also valid put the brackets around formal arguments like this:
def f(x)
...
end
The same applies when calling the method. Both styles are valid:
a = AddOne.new
a.f 1  # => 2
a.f(2) # => 3
But when the method has two or more arguments, you must use brackets around the method call.
def add_two(a, b)
    a + b
end
add_two(1, 2) # => 3
add_two 1,2 # => 3
add_two 1 2 # => not OK
I found this kind of inconsistent, considering languages like F# that has a similar function application syntax allows the second form (with currying).
Syntactic Sugar for Setters
class Holder
    def initialize
        @x = 3
    end

    attr_accessor :x
end
h = Holder.new

h.x= 1 # Ok this makes sense, it's a short-hand for h.x=(1)
What the tutorials didn't tell me is why code like the following works:
h.x = 1 # Why does this work? and what does it even do?
At a glance, it parses in my head like (h.x) EQUALS TWO. It took me a while to find out the answer. It's a syntactic sugar--Ruby will convert that into a method call into x=. In other words, all of the following are the same:
h.x=(1)
h.x= 1
h.x = 1
We can deduce from this syntactic sugar that the "get_x/set_x"-style method naming convention doesn't make too much sense in Ruby. When an attribute-like method name ends with =, we know it's a setter, and otherwise it's a getter.
Blocks
Ruby has blocks, which are kind of like lambdas in Python in that you can pass in a block of code to be executed by the method. Here is an example:
5.times {|x| puts x} # prints 0 1 2 3 4
5.times do |x| puts x end # same as above
Of course, in Ruby, there are two ways to write the same thing, but that's fine, I am used to that by now. What I found complicated was how to actually use them and how they interact with other method parameters. First, all methods in Ruby will take an implicit block, after the last parameter. In the following example, it's okay to call f with a block because every method accepts an implicit block. f just doesn't use it.
def f a
    puts "f is called with #{a}"
end
def f_no_argument; end
f(5) {|x| puts "block called" } # this block is unused.
# Output
# f is called with 5
Note that a block is not exactly the same as the last argument to the call. It must be specified outside the brackets for the arguments (if they are around).
f(5) {|x| puts "block called" } # OK
f 5, {|x| puts "block called" } # not OK
# No-argument examples
f_no_argument {|x| puts "block called" }   # OK
f_no_argument() {|x| puts "block called" } # OK
Once inside a method, calling the passed-in block requires using the keyword yield, which means a very different thing than in Python.
yield
yield in Ruby executes the block passed in. yield is a bit special compared to regular function calls because Ruby doesn't seem to validate the number of arguments in the block. For example, calling the following method f without any argument will give you ArgumentError:
def f x; puts x end
f 1 # ok
f # ArgumentError (wrong number of arguments (given 0, expected 1))
But calling a block with a wrong number of arguments is fine.
def f
    yield
    yield 1
    yield 1, 2
end
f {|x| puts x} # not a problem
The missing arguments are substituted with nils.
procs
Unlike lambdas, blocks are not really assigned to a variable. In order to actually grab the block and do the normal variable-like things (e.g., storing it, or forwarding it), you can accept it as the last argument prefixed with & to auto-convert it to a proc, which is then bound to a normal variable.
def addOne(x, &p)
    # p is a Proc
    p(x + 1)
    yield x + 1
end
addOne(1) {|x| puts x}
# output:
# 2
# 2
In this example, p refers to the block that prints. Note that yield also continues to work.
Procs can be converted back into a block argument to another function by prefixing & again. In the following example, forward takes a block as a proc, then converts it back to a block, to be passed into Integer#times.
def forward &p
    2.times &p
end
forward { |x| puts x }
# output:
# 0
# 1
Percent Strings
Percent Strings are another type of syntactic sugar that makes it easy to write a certain constructs like symbol arrays. But if you have never seen them before, you can't really guess what they mean. Here are some of them:
# %i for symbol arrays (i stands for what?)
%i(a b c) # => [:a, :b, :c]
# %w is like %i except it gives you a string array (w for words?).
%w(a b c) # => ["a", "b", "c"]
# %q for a string (q for quotes?)
%q(a b c) # => "a b c"
# %r for a regex pattern (r for regex?)
%r(a b c) # => /a b c/
# %x is a subshell call (x for.. eXecute?).
%x(echo hi) # => "hi \n"
`echo hi`   # just one more way to do it
3 Ways to Write a Hash
Most tutorials cover 2 different ways to write a Hash (i.e., dict in python). The first is the most verbose way, listing each key and value:
x = {"a" => 1, "b" => 2}
The second way is a short hand, if you want the keys to be symbols:
x = {a:1, b: :b}
x = {:a => 1, :b => :b} # equivalent to line above
What tutorials often don't cover is the third shorthand-form, which can be used only as the last argument to a method call.
puts a:1, b:2 # prints {:a=>1, :b=>2}
In this case, a and b are symbols. Again, this only works if the hash is the last argument to a function call.
puts 1, a:1, b:1
Curiously, this does not work for assignment, or an assignment-like method call. Check out the following:
class Test
    attr_accessor :member
end
t = Test.new
t.member = a:1 # does not work
t.member= a:1  # does not work
t.member=(a:1) # does not work
instance_eval for that magic DSL look
The last core ingredient for understanding Ruby is instance_eval. instance_eval takes a block and will run the block in the context of that instance. Effectively it just swaps the self of the block. The following demonstrates something that resmbles a typical Ruby DSL. It will let you configure a Hash in a cool-looking way.
class DSLTest
    def initialize
        @config = Hash.new
    end
    def configure
        yield @config
    end
    def run &p
        instance_eval &p # this means to convert the proc p back into a block
        puts "Configuration is #{@config}"
    end
end

x = 9
DSLTest.new.run do
    configure do |c|
        c[:key] = x
    end
end

# prints Configuration is {:key=>9}
Conclusion
Matz, the creator of Ruby, wanted a “[…] a scripting language that was more powerful than Perl, and more object-oriented than Python”. And I can certainly agree that Ruby has achieved both. It is more object-oriented than Python. It is also Perl-like- in both good and bad ways. Ruby can be concise and powerful, but I can't help feeling bothered by how there is always more than one way to do something. I don't like it, but I can now read Ruby code without being completely intimidated, at least. I hope this post is helpful to those who struggle to understand Ruby.
Raspberry Pi thermostat - Python Controller
This is a continuation of the Raspberry Pi thermostat series. The hardware part can be found here.
Summary
With the hardware built, now we need software to control the thermostat.
I decided to use Python for its simplicity. At first, I put up a simple website where I can control the thermostat using my phone. Soon, I realized it's actually easy to integrate with Apple Home via Homebridge so I implemented the interfaces required to get that working as well. Doing that let me do things like "hey siri, set the thermostat to 26 degrees".
The following is the overview of the solution:
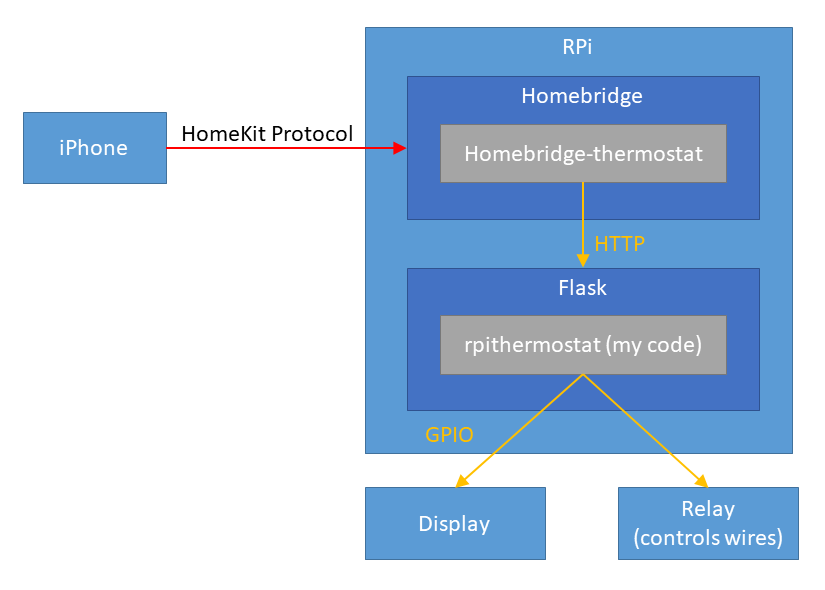
The code is here, but it has lots of features that are not necessarily used today.
Python Server
Libraries
- RPi.GPIO for controlling GPIO pins. This comes with the Raspbian OS already.
- Flask to put up a simple HTTP interface for homebridge.
- DHT11 for interfacing with DHT11 sensor.
- Adafruit_Python_CharLCD to control the 1602 display.
Components
The server just spins up a bunch of servers (implemented as threads) that polls sensors and carry out actions. Whether Python performs well with multi-threading is irrelevant here since the CPU is mostly idle.
There are 5 parts: pconfig, display, temphumids, oracle, and server.
pconfig - for persistent configuration
Since Raspberry Pi can lose power or need to restart for updates, you need to save the configuration on the main disk.
The code is dead-simplee. It just reads from and writes to a JSON file every time you ask. Because the call volume is so low, there is no performance impact to worry about.
Stuff that is saved: * Target temperature day & night - I find that I always want the temperature to be 2 degrees C higher than during the day, so I have a separate profile for that. * Target humidity * Current Governor (see below)
temphumids - temperature & humidity sensor
temphumids records the temperature & humidity every second.
You can also query for the latest sampled temperature & humidity. In reality, I take an average of all the samples collected in the last 30 seconds because DHT11 measurements fluctuate a bit.
display - displays two lines
Display literally accepts two lines to display and just forwards it to the LCD.
oracle - tells controller what to do based on your preference
What the oracle does
is simply to run what I call a 'governor' periodically (30s)
carry out actions. Definitely not the best design but the program is small
enough that it does not really matter much.
I have three governors: off, cool and heat.
| Governor | What they do |
|---|---|
| off | This governor just leaves everything off. |
| cool |
This governor makes sure that your home is cool and dry. The interesting thing
I learned is that leaving the fan ON makes your home very humid even with the
cooling coil on. Apparently the reason is that if the fan is on, the water has
no chance to condense on the coil.
|
| heat | This is pretty simple, it just turns heat on whenever it's cold. It doesn't really care about humidity because there is nothing you can do in winter to improve the situation. |
server - interface for homebridge-thermostat
Homebridge is an open-source NodeJS server that interfaces with Apple Home via HomeKit API.
Using the homebridge plugin homebridge-thermostat, you can just provide the HTTP interface for the thermostat and let your iOS devices control your thermostat. The plugin is poorly documented but I was able to read the source code to find out what APIs you need to implement.
Interfaces you have to implement: * /status return the governor, temperature and humidity information * /targetTemperature/t - set the target temperature * /targetRelativeHumidity/rh - set the target humidity * /off - set governor to off * /comfort - set govenor to heat * /no-frost - set governor to cool
Make the server run on boot
Of course, we want this service to be running all the time. The best way to achieve this is to make it into a systemd service. Making a simple systemd service is very easy. First, write a service definition file like this:
[Unit]
Description=Raspberry Pi Theromostat
After=syslog.target

[Service]
Type=simple
User=pi
Group=pi
WorkingDirectory=/home/pi/src/rpi-repo
ExecStart=/bin/bash -c "FLASK_APP=rpithermostat.server ./venv/bin/flask run --with-threads -h 0.0.0.0"
StandardOutput=syslog
StandardError=syslog

[Install]
WantedBy=multi-user.target
This works great because all the standard out and error just gets redirected to syslog, which is what you want normally anyway.
To install this, just copy the file into /etc/systemd/system/. Then run systemd enable servicename
to make it run when booted up. Run systemd start servicename to start the service right away.
Other caveats
The homebridge would randomly stop working. I never bothered to figure out why, but I "solved"
the issue by just creating a cron job that restarts every hour (0 * * * * systemctl reboot).
It has been working well for many months now without any issues.
Future Improvements
I could improve the heat governor by making it control the power outlet attached to a humidifer in winter. That way I can make the humidity just right.
Raspberry Pi thermostat - Building the hardware
This blog is about building my own thermostat with Raspberry Pi. This is part 1 where I explain the hardware. Part 2 talks about how I build the software that controls it.
What did I not like about the mercury thermostat?
I didn't like my old mercury-based thermostat for a couple reasons. First, the temperature fluctuation was pretty significant, up to 3 degrees C because mercury takes a while to react to the temperature change, Also I didn't like having to go to the living room to adjust the thermostat all the time.
Why did I not just use Ecobee or Nest? This was for fun & to learn how to build basic electronics using RPi ;)
Prerequisite
The interface to the HVAC is a simple single stage 4-wire control.
heatresistive heat strips - white - not used- fan - green
coolingheat pump - orange- power - red
Thank you /u/Nephilimi for the correction.
Basically, you just need to connect the power wire to what you want to turn on.
Connecting power to
heat or
cooling will heat/cool your coil.
Since I live in an apartment equipped with a heat pump, connecting power to heat pump will cool in summer and heat in winter.
Then you also need to run the fan for the air to circulate.
Parts needed
- Raspberry Pi - it can be any model really, but you want wifi for remote control.
- You need 3v, 5v, GND, and 4 GPIO pins minimum. 7 more for a 1602 display.
- Soldering equipments (example)
- Lots (10~20) of female to male jumper cables (example)
- Wires - I just used a 22 gauge wire
- Prototyping board (example)
- 3 x 2.2k and 3 x 10k Resistors
- 3 x 2n2222 NPN transistors
- DHT11 digital temperature & humidity sensor
- Minimum 3 channel relay (this is what I used)
- A 1602 display, if you want to display status also. It's named 1602 because it displays 2 rows of 16 characters.
Circuit
Here's the schematic for the core parts:
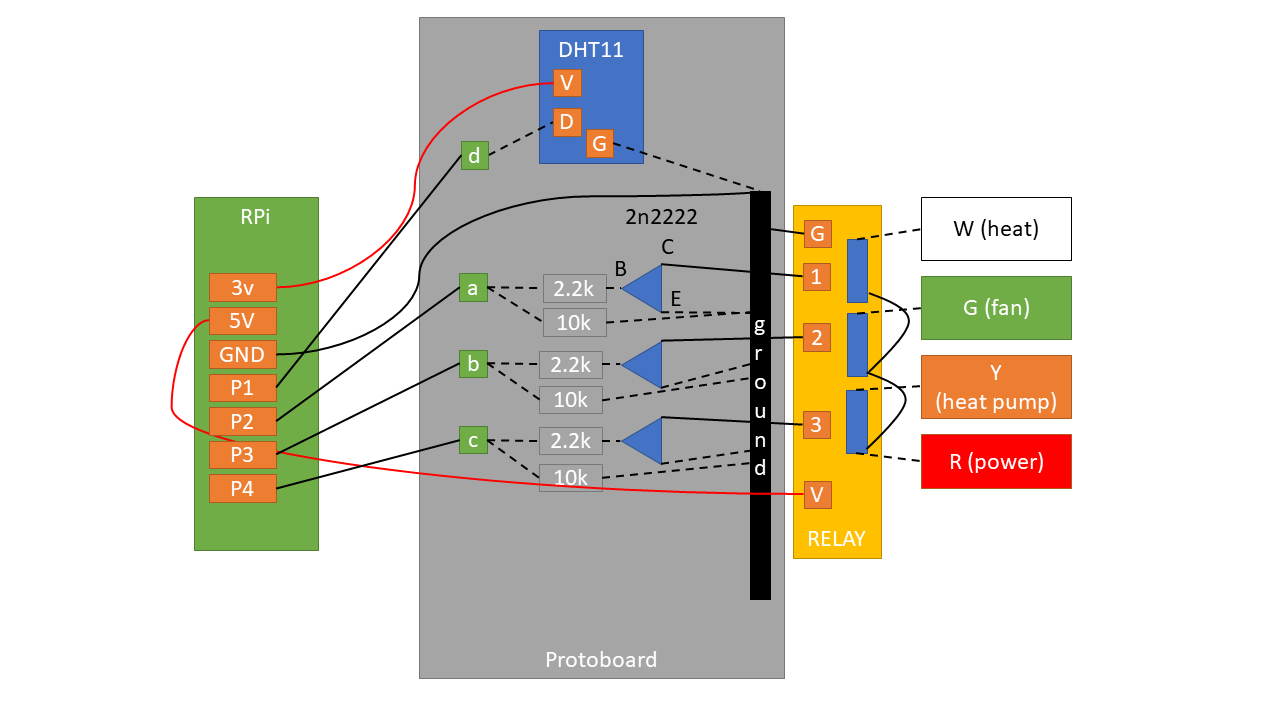
Solid lines denote where I had to use a wire. Dotted lines denote where I didn't have to use a separate wire thanks to either the board or existing wires.
Pins
P1 ~ P4 denote any free GPIO pins.
- 3.3v to power DHT11.
- 5v to power the relay.
P1communicates with DHT11 (both read/write).P2~P4controls the three relay outputs.
Communicating with DHT11
DHT11 needs only one data pin because it both handles input and output through the same pin.
Controlling the relay
This was the only non-straightforward part that required a bit of thinking. When the relay is powered, the switches are simply disconnected. In order to 'close' (or, connect) the switch, you need to drain the current from the relay pins.
This is where the NPN transistor helps. It has 3 parts: base (B), current (C) and
emitter (E). Electricity flows from C to E, only if voltage is
applied on B.
In this case, C accepts current from the relay, but it doesn't let it go through
E unless B has voltage. And we control the voltage by setting the line high
from the Rpi.
So in my circuit, asserting P1 high connects power to
heat. P2 and P3
controls fan and cooling
respectively.
Finished hardware
Here's a ghetto looking finished thermostat in action:
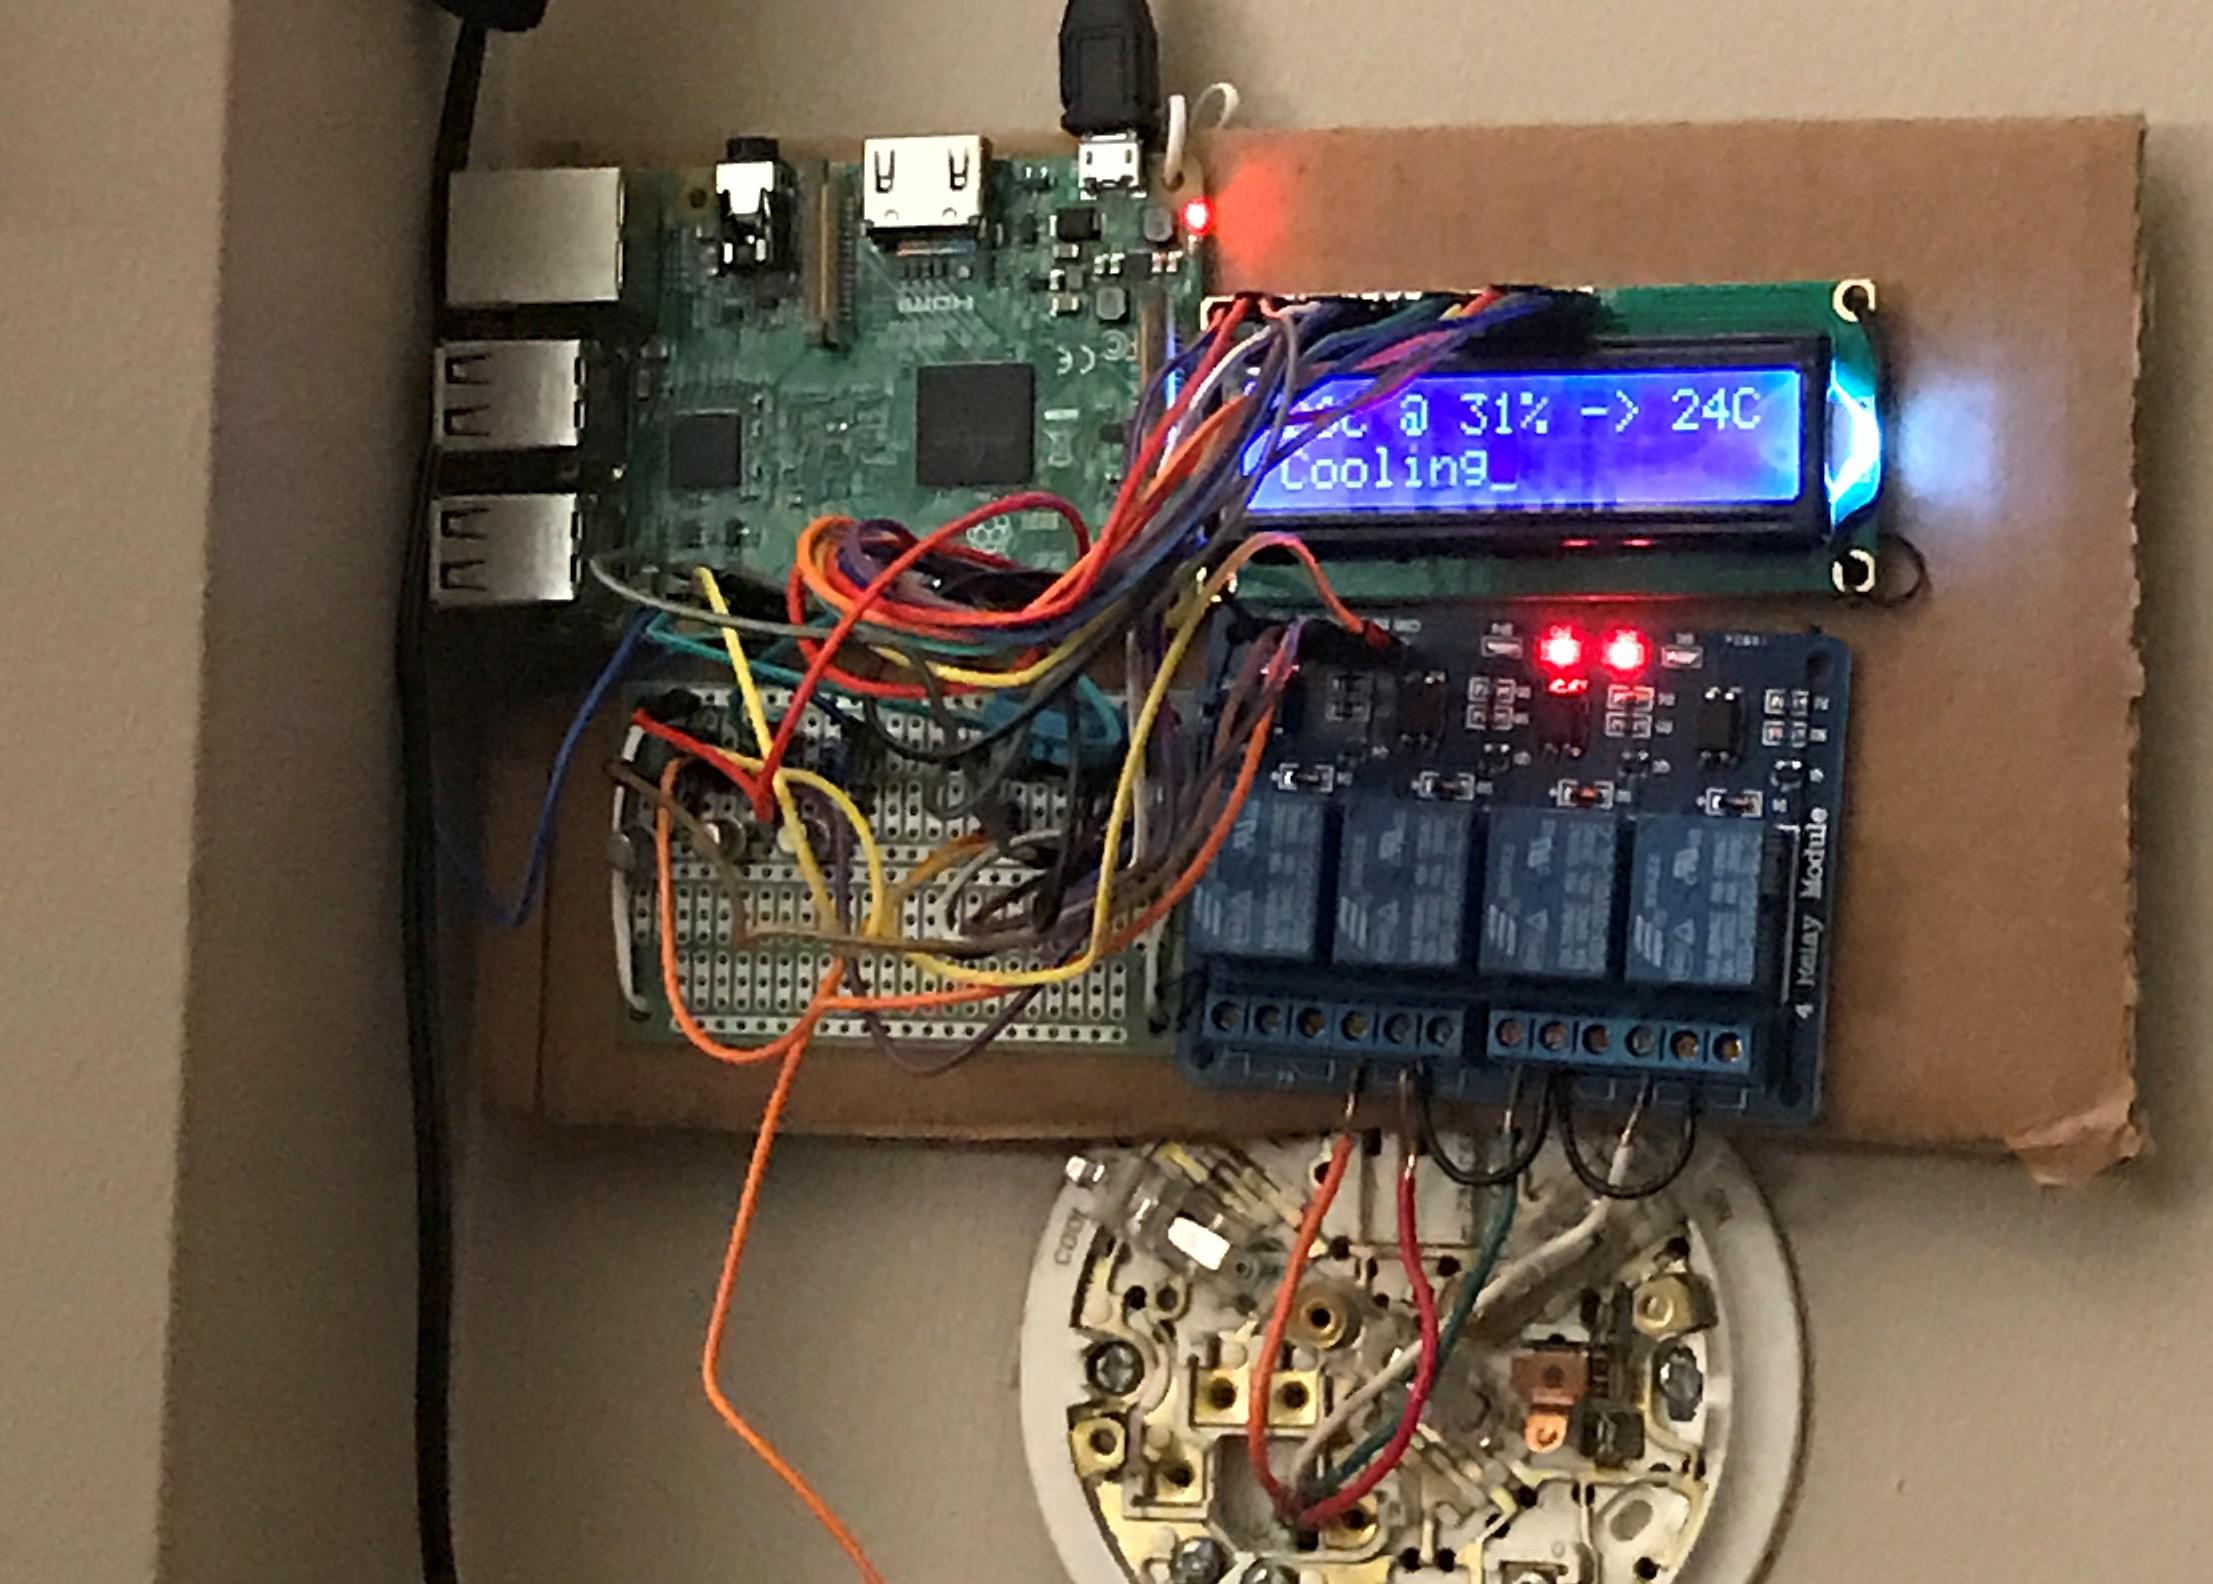
Due to my lack of any real hardware skills, I could not put together in a more polished way.
What's next?
Check out the part 2 for the software that runs this thermostat.
OS Detecting QMK keyboard
What bits are exchanged when you plug in a USB keyboard? Can you detect the OS with those bits?
Recently, I got a mechanical keyboard named KBDfans Tiger Lite as a gift (Thanks Rose!). The keyboard runs the QMK (Quantum Mechanical Keyboard) keyboard firmware, which is open source and allows easy custom modification of the keyboard. I was pretty excited to get my hands on it, since I've been wanting to be able to customize my keyboard firmware.

There were a few tweaks I wanted to make directly on the keyboard that were either impossible or hard to do reliably otherwise:
- Consistent Media key layout across computers.
- On Windows, AutoHotkey can't intercept keystrokes for Admin applications without also itself running as Admin, which I didn't want to do.
- On Mac:
- I want to use a single modifier key (i.e., Right Alt) to switch between languages. MacOS doesn't allow a single-modifier shortcuts, and the Mac Fn key, which can switch languages, is non-trivial to simulate.
- I found the MacOS emoji shortcut ^⌘+Space is legitimately hard to enter for me, compared to the Windows equivalent ⊞+..
- I wanted the keyboard to automatically switch to the MacOS-friendly layout when I switch from my personal PC to my work laptop, and vice versa.
The first three items were fairly simple to do with QMK. However, the last item, OS detection, proved to be non-trivial. QMK doesn't have such a feature built-in, and the USB devices don't get much information about its host (i.e., PC) at all.
I was able to put together something that works over the holidays, and I wanted to share the details of how it works.
Prior Work
The idea was first described in an Arduino project called FingerprintUSBHost, and Ruslan Sayfutdinov (KapJI) implemented a working version for QMK. Without the existing examples, I wouldn't have been able to come up with this idea.
Just Merge it!
After merging KapJI's change, the code mostly worked, but it was missing one major feature for me: when I switch between the PC and the Mac, the OS detection stopped working after the first device.
After reading the OS-detection code by KapJI, I understood that there is a function get_usb_descriptor to return whatever USB descriptor type the host requests, and that their os detection code records the frequency of the value of the wLength field for "String-type descriptors". I had a vague understanding of what a "usb descriptor" might be (that it's related to the USB device initialization) but wasn't sure how it works. I understood that this counter has to be reset but wasn't sure where to do it. There was documentation for the feature but, it did not explain to me why this works, or what the meaning of those fields were. I decided to dig deeper since I was having a slow week.
How does the OS detection work at all?
After some Googling, I found an amazing tutorial on USB called USB in NutShell by Craig Peacock at beyondlogic.org. Here's the summary of I learned about USB that is relevant:
- Every USB device goes through the setup process. As part of the setup process, the host requests for a bunch of descriptors to learn about the devices. "Descriptors" are generic structures used to describe a USB device. There are many subtypes of descriptors.
- A USB device is described by one Device descriptor:
- A Device descriptor contains Configuration descriptors (but usually there is only one).
- A Configuration descriptor contains Interface descriptors.
- An Interface descriptor corresponds to what we end-users think of as an actual "device" in the OS. An Interface descriptor contains Endpoint descriptors.
- Endpoint descriptors describe the communication pipes for their interfaces, which is how the interface actually exchange bits and bytes with the host.
- Descriptors can refer to each other. For example, a Device descriptor has its name and its manufacturer, but they are not included in the Device descriptor itself. Rather, the Device descriptor makes a reference to a String descriptor by its index, which contains the actual String data.
- For String Descriptors,
wLengthfield refers to the maximum size of the string that the host is willing to accept.
As an example this was the list of all of its descriptors for my keyboard.
Putting it All Together
With this background, I was finally able to understand how the OS-detection works:
- When the keyboard is plugged in, the host asks for the device descriptor and its subparts.
- For this particular keyboard, there are 3 String descriptors of interest:
0x00: List of supported languages for all String descriptors. For QMK, it's hard-coded as US English0x01: This is the name of the manufacturer of the keyboard0x02: This is the name of the product itself (i.e., keyboard)
One interesting quirk that makes the OS-detection work is that the real-world OSes request the same String descriptor multiple times with different wLength, which specifies the maximum size of the String that the host is willing to accept.
For example, Windows asks for the same product string with wLength of 4, 16 then 256 and twice each (Full sequence here). MacOS is slightly different.
So why does this particular call pattern occur? My guess is that this behaviour exists to work around defective USB devices. For Linux, I was able to find its source for querying String descriptors. First thing to note is that the behaviour that the OS-detection code looks for is consistent with the source code that we see. Linux asks, right away, for strings with wLength 255 (0xff) and never again if the device is well-behaved. Second, Below the initial String query, you can also see that Linux has different workarounds for defective devices, which didn't kick in for my keyboard.
While I can't read the source for Windows or MacOS, but based on the Linux code, it seems likely that the other OSes also have similar workarounds for different USB devices. Lucky for me, these wLength patterns occur consistently enough for the OS-detection code to work reliably.
When to reset the OS detection data?
Now that I know how the OS detection works, I still had to find out where to reset the OS detection counter, since the original code didn't have any call to clear them.
My first attempt was to just delete the counter when the host asks for the Device descriptor, since that is the top-most logical object of the device. Unfortunately, this didn't work for a couple of reasons. First, there is no guarantee that the Device descriptor is only queried once and in fact the supported language String descriptor (index 0) can be logically queried even before the Device descriptor itself, since it's independent of the Device descriptor.
After going through the QMK source code, I found that there is an undocumented hook named notify_usb_device_state_change_user, which gets called on USB reset, which happens when the KVM switches between the host devices.
The original code also doesn't specify how long I need to wait after the USB-reset before executing the OS-detection (it just says "probably hundreds of milliseconds") but by now I knew exactly how long:
A USB compliant Host expects all requests to be processed within a maximum period of 5 seconds
Based on my observation, however, 1 second was plenty, so that's what I settled with, and now I have a cool, one-of-a-kind keyboard 😁
Essay on Inheritance - Popular, Attractive, and Not Very Good
Despite being one of the most popular code-reuse pattern, inheritance often leads to messy, less maintainable codebase in the long term. Why is it popular if it's bad? What can you do instead?
Inheritance is still a widely used tool in software design. I think there is something fundamental to inheritance that makes it attractive to software developers. But it’s not often the right tool to use.
Ten years ago, I was doing web development. The web application I was working on used Widget classes which produced HTML and JavaScript markup for the browsers. Unfortunately, we were still dealing with ancient quirky browsers, so we had to emit different markup for different browsers. We decided to use inheritance to solve this problem. We named each class after the browsers they support: IEWidget and FirefoxWidget, each inheriting from Widget.
The subclasses overrode relevant functions to adapt to different browser behaviours. This worked well for a while until a new popular browser called Chrome entered the market. The natural reaction to this was to create a new subclass for Chrome, except this couldn’t be done without duplicating a lot of code from the other classes. Clearly, the class design wasn’t working very well.
Stack could be implemented use an ArrayList as a member, rather than inheriting from it.
It became much worse as we moved into the wild world of mobile browsers where there were more than a handful of browsers with different quirks. It was obvious to me this design didn’t really scale but I didn’t know what to do back then.
Over time as I worked with more code, "composition over inheritance" suddenly clicked. I've read about it before, but it wasn’t obvious to me how to apply it well. I’ve worked at a few more companies since then, but I still see it misused all the time.
Popularity of Inheritance
In 2001, Joshua Bloch wrote in Effective Java why we should favour composition over inheritance. It’s been almost two decades since then. Why do we keep seeing this? I can think of a few reasons for this.
First, there is a whole generation of developers who were taught inheritance as the primary method of OOP design. Many earlier popular libraries have been written using inheritance. The famous unit test framework JUnit introduced the concept of unit test classes where you inherit from the base TestCase class. JUnit moved on to the new annotation-based style but it didn’t stop developers from structuring tests the old way. Newer frameworks like pytest use composition via dependency injection as the primary method for organizing test dependencies. My experience with pytest has been very positive. The framework naturally leads to more modular tests.
Fortunately, this seems to be going away. When I took a software design course in 2011, they didn’t teach composition over inheritance. Now it seems to be part of the curriculum.
Second, inheritance offers the path of the least resistance for implementation reuse. Mainstream languages like Java do not offer a convenient way to do composition, at least compared to inheritance. Inheritance gives you a special syntax to construct your parent class, for example. Compare that to composition where you have to pass the object via a constructor, add a member variable, and then every method call over that object has to be qualified with the name of the object. It feels wrong to have to go through so many steps! Combined with the tendency for Java developers to have verbose variable names, no wonder many people default to inheritance (just imagine having to write abstractCollection.x(), instead of x() for every delegated function x).
Another reason is that it takes a lot of experience and deliberate thinking about software design to understand and experience issues with inheritance. Let’s go back to the WebWidget example I mentioned earlier. The design worked fine for many years until the requirements changed (i.e., numerous new browsers). Once the requirements outgrew the design, the signs of a design breakdown like downcasting appeared in the codebase (i.e., instanceof in Java & dynamic_cast in C++). Unfortunately, by the time this happens, the original designers may not even be around to learn the consequences of their design. Even if they were around, they would have to know about the alternative design choices (like composition) to realize how it could have been done differently. Put it another way, you have to be at the right place at the right time to learn the lesson.
Deadly Attraction of Inheritance
Unlike the long-term downsides, there is an immediate upside to using inheritance. It gives developers nice, warm feelings right away. Seriously, developers have an occupational disease—genericitis—for both reusing code and categorizing objects, sometimes to their demise. Inheritance as a tool does both, so it’s insanely attractive for developers. It’s a dangerous trap, really. It feels good now, but it hurts you later. Many leaders in software design have been warning us about this particular trap through rules like composition over inheritance, the rule of three and YAGNI (you aren’t gonna need it). Unfortunately, they are not as well-known as principles like DRY (don’t repeat yourself). My explanation for this is that principles like the rule of three embody the next level of understanding above principles like DRY. This is something worth exploring more deeply.
Underneath the rule of three is the learning that we are not so good at predicting the future. This is well-known in the project management circles as the cone of uncertainty. Software design at its core is about making bets about the future. We predict what data belongs where, and how objects will interact with each other. When we get the design right, it pays off by making the code easier to modify and extend. On the other hand, when you make a wrong design decision, it bites us back with higher maintenance costs later. The stronger your prediction is, the more expensive it gets when you get it wrong. There is value in making a weaker prediction because it will cost you less when you get it wrong.
Let’s connect this back to inheritance. Inheritance is a very narrow prediction about the future. It defines strict subtyping relationships. Implicit in the relationship is the assumption that child classes do not overlap, and that they fit in a hierarchical category sharing implementation in a certain way. However, unlike mathematical objects, real-world entities can rarely be categorized hierarchically. The world of web browsers looked hierarchical until they weren’t. File systems were categorized into the "Unix-type" (/ as path separator, and case sensitive), the "Windows-type" (\ as path separator, and case insensitive), until they couldn’t be—HFS+ on MacOS uses / as path separator but it is case-insensitive. Evolution looked like a mathematical tree until we found out about the horizontal gene transfers. Hierarchical categorization is a good aid to understand the world, but it is often not the right tool to describe the truth. Inheritance is a narrow bet that is unlikely to pay off later.
One important thing to note is that the issues of the hierarchical categorization don’t apply when we use them to model an artificial world like mathematics. Every natural number is an integer. The set of all natural numbers don’t overlap with negative integers. We can be assured of this relationship not changing because we defined them that way. The troubles occur when you conflate prescriptive concepts like integers with real-world descriptive concepts like web browsers.
Difficulty of Advocating for Simpler Design
Advocating simpler designs at work could be challenging. It takes a lot of courage and conviction to say, “I don’t know what the future looks like”. Convincing others of this is a fundamentally asymmetric battle. Fancy designs, however wrong they may be in the future, sounds a lot cooler. On the other hand, enumerating all the ways the design could go wrong is much harder. The irony is that it’s harder because future prediction is hard.
This do something vs. do nothing asymmetry can be found in other fields. In medicine, iatrogenesis refers to the harms caused by medical professionals attempting to heal, rather than not doing anything. For example, the misuse of antibiotics brought us the lethal superbugs. Even though antibiotics don’t help with the common cold, many people still believe that it’s effective and demand their doctors give them the drugs. It’s much harder to explain to patients why antibiotics don’t work for colds than to write them a prescription and keep the patients happy. Never mind those micro bacterial superbugs kill thousands every year, unlike the common cold.
It’s human nature to do something than nothing even when it’s harmful to do things. Taleb talks about this problem in his book Antifragile.
What can we do about it
Here’s a very practical set of ideas for all of us to fight this problem.
As an individual developer, you can start building your modules using composition and show your co-workers that there are different, better ways to organize code. The maintenance benefit may not show immediately. One thing that will show immediately, though, is the ease of unit testing, as it is significantly easier to test delegation than different branches of inheritance hierarchy.
If you are using Python and are using the unittest module to write tests, consider switching to pytest. pytest supports the legacy unittest style tests as well so you can have an easy transition.
If you are using C++, you can make use of private inheritance over public when the subtyping relationship is not warranted.
As for Java, I think developers should consider using super-short single-letter member names for trivial compositions that would have been inheritances (e.g., a instead of abstractCollection). Some code reviewers may flinch when they see a single letter variable name, but I don’t think such a reaction is warranted. It’s still clearer than the inherited methods where method names are imported completely unqualified, and possibly from multiple ancestors. Such composition is supported by the same principle that recommends against import *, that it’s bad to import unspecified symbols into the scope. On the other hand, making variable names verbose when its meaning is unambiguous is not supported by any reason.
Finally, you can spread the word by sending your coworkers a link to this blog post.
Debugging ARM without a Debugger 3: Printing Stack Trace
This is the last post in the series Debugging ARM without a Debugger.
This is an excerpt from my debugging techniques document for Real-time Programming. These techniques are written in the context of writing a QNX-like real-time microkernel and a model train controller on an ARMv4 (ARM920T, Technologic TS-7200). The source code is located here. Mby teammate (Pavel Bakhilau) and I are the authors of the code.
A stack trace is the ultimate tool that can help you tell exactly where a problem is occurring when used in conjunction with asserts (e.g. in my code, an assert failure triggers the stack trace dump. I also wired the ESC key to an assert failure).
It is particularly useful when you have a complex applications with deep call stacks. For example, if an assert has failed in a utility function such as stack_push in a complex application, it is practically impossible to figure out what happened where without putting print statements everywhere.
With a stack trace, we can re-construct the run-time call hierarchy and find out what is happening. At the end of this article, I will present an example of sophisticated stack trace output that can help us diagnose complex concurrency issues.
Stack Frame Structure
We can deduce the exact stack frame structure from the assembly code generated by the compiler (GCC-arm in my case). Here is an example of a typical function header:
func:
mov ip, sp
stmfd   sp!, {(other optional registers), sl, fp, ip, lr, pc}
sub fp, ip, #4
; function body continues...
The compiler will save the registers pc, lr, ip, fp, sl into the stack in that order. Additionally, the compiler may save any other scratch register used in the function. Important registers for printing a stack trace are pc, lr and fp.
Note that if any compiler optimization is turned on (e.g. -O flag), you need to pass the extra argument -fno-omit-frame-pointer. Otherwise, GCC will optimize out the code that saves the frame pointer.
pc (program counter)
Reading the saved pc gives us the address of the entry point of the function plus 16 bytes. This is because pc is always 2 instructions ahead in ARM when we save it.
lr (link register)
The lr register is the address to return when the current function returns. An instruction before lr would give us the exact code address of the caller of the current function.
fp (frame pointer)
This is the frame pointer of the previous function. We will need to read this in order to “crawl up” the call graph.
Stack Trace Crawler
Here is the pseudocode (or the actual code) for printing the stack trace:
// a poorly written macro for reading an int at the specified memory address x.
#define VMEM(x) (*(unsigned int volatile * volatile)(x))

lr = 0; depth = 0;
do {
   pc = VMEM(fp) - 16;

   // print here: the calling code is at lr, the current function addr is pc

   if (lr is invalid) break;

   lr = VMEM(fp - 4);
   fp = VMEM(fp - 12);

   if (fp is not a valid memory or depth too big) break;

   depth++;

} while (the current function is not a top-level function && depth is < some threshold);
Here's an example code for reading the frame pointer which is required to start printing the stack trace:
#define STRINGIFY(x) #x
#define TOSTRING(x) STRINGIFY(x)
// reads the register reg to the variable var
#define READ_REGISTER(var,reg) __asm volatile("mov %[result], " TOSTRING(reg) "\n\t" : [result] "=r" (var))

int fp; READ_REGISTER(fp, fp);
The most important thing here is that you want this code not to fail. Here are common things that can happen that you don't want:
- Abort inside another abort (or, an abort inception; install a good abort handler to find out why)
- Invalid pointer dereference (e.g. outside the physical memory, or outside .text region)
- Stack overflow which will lead to another abort (by getting stuck in an infinite loop of crazy corrupt frame pointers)
Finding out the corresponding C code
Use the command objdump -SD executable | less to figure out what the C code is at a given address. Passing the compiler flag -ggdb enables objdump to print the C source code next to the disaseembled code. It may not always work with higher optimization level.
Printing the function name
The debugging process can be much faster if you can see the function names in a stack trace right away when the program crashed, instead of running objdump every time manually.
The proper way to do it is to read the debugging information from the .debug section of the memory. I did not have time to do that, so instead I built my own symbol table array using a shell script hooked up to the makefile.
This symbol table does not need to be sophisticated. A simple array of a function address and its name is good enough. This is because the performance is not a concern when you are printing the stack trace of a crashed system. Another reason is that we want this code to work all the time. It is pretty hard to mess up a linear search.
The symbol array is built off the exported symbols. The method I have used is simple. After compiling all the source code into assembly files, I run a shell script to search for the string “.global” in all the assembly files to generate the exported symbol table. Then I compile the generated code of exported symbols as well, and then link it all together at the end. The following is a sample code how to do it:
funcmap.h (funcmap provides the interface to find function names given an address)
typedef struct _tag_funcinfo {
   unsigned int fn;
   char *name;
} funcinfo;

/* call this before calling find_function_name */
void __init_funclist();
funcinfo *__getfunclist();
/* call this function to find the name of the function */
static inline char* find_function_name(uint pc) {
 funcinfo* fl = __getfunclist();
 int i = 0;

 while (fl[i].fn != 0) {
    if (fl[i].fn == pc) return fl[i].name;
    i++;
 }

 return "[unknown function]";
}
funcmap.c (generated by a shell script)
#include <./task.h> // include ALL the header files

static funcinfo __funclist[1]; // the length of this array is also generated

void __init_funclist() {
   int i = 0;
   __funclist[i].fn=(unsigned int)some_func;
   __funclist[i++].name="some_func";
   // .. more
   __funclist[i].fn=0; // null terminated

}
funcinfo* __getfunclist() { return __funclist; }
Lastly, this is how I read all the function names from assembly files in the shell script (the actual script):
FUNCTION_COUNT=`find . -name '*.S' -o -name '*.s' | xargs grep .global | awk '{print $3}' | grep -v '^$' | grep -v '^__' | sort | uniq | wc -l`
FUNCTIONS=`find . -name '*.S' -o -name '*.s' | xargs grep .global | awk '{print $3}' | egrep -v '(^$|^__|PLT|GOT|,)' | sort | uniq`
Putting it all together (Example)
Combining the stack trace with task information can be even more powerful than what basic C debuggers offer.
The following is an example of a stack trace output for multiple tasks. It prints two lines per task.
Task 0 {noname} (p:31, pc:0x2180b8, sp0x1edfe34, lr:0x2506d8, WAITING4SEND):
nameserver @ 0x2505e8+0,
Task 1 {noname} (p:0, pc:0x24c55c, sp0x1eafff0, lr:0x21809c, READY):
kernel_idleserver @ 0x24c550+0,
Task 3 TIMESERVER (p:31, pc:0x2180b8, sp0x1e4ff80, lr:0x21d1cc, WAITING4SEND):
timeserver @ 0x21d074+0,
Task 4 {noname} (p:31, pc:0x2180d0, sp0x1e1ffe0, lr:0x21f818, WAITING4EVENT):
eventnotifier @ 0x21f7c4+0,
Task 5 IOSERVER_COM1 (p:31, pc:0x2180b8, sp0x1deff04, lr:0x21eab8, WAITING4SEND):
ioserver @ 0x21e82c+0,
Task 6 {noname} (p:30, pc:0x2180d0, sp0x1dbffe0, lr:0x21f818, WAITING4EVENT):
eventnotifier @ 0x21f7c4+0,
Task 7 IOSERVER_COM2 (p:31, pc:0x2180e0, sp0x1d8fe6c, lr:0x21e104, RUNNING):
[unknown function] @ 0x21df94+0, ioserver @ 0x21e82c+253,
Task 8 {noname} (p:30, pc:0x2180b0, sp0x1d5ffe0, lr:0x21f830, WAITING4REPLY, last_receiver: 7):
eventnotifier @ 0x21f7c4+0,
Task 9 {noname} (p:2, pc:0x2180b0, sp0x1d2f878, lr:0x22006c, WAITING4RECEIVE):
uiserver_move @ 0x220018+0, timedisplay_update @ 0x23bed4+49, dumbbus_dispatch @ 0x21a5a8+15, a0 @ 0x234c88+646,
Task status code:
WAITING4SENDmeans the task is waiting for another task to send a message.WAITING4RECEIVEmeans the task has sent a message but the receiver has not received the message yet.WAITING4REPLYmeans the task has sent a message and someone received it but has not replied yet.last_receivertells us the last task that received the message from this task.WAITING4EVENTmeans the task is waiting for a kernel event (e.g. IO).READYmeans the task is ready to run next as soon as this task becomes the top priority task.RUNNINGmeans the task is currently running.
The first line displays the task number, name, priority, registers, task status and the task synchronization information. The second line displays the stack trace with the offsets from the address of the function.
Why is this powerful? We can use this to solve really complex synchronization issues with wait chains & priorities that is otherwise nearly impossible to without this information. At the end, we had more than 40 tasks interacting with each other and my life would have been much harder without this information.
Limitations
The major limitation of this method is that it can't print the names of static functions. This is because the symbols for static functions are not exported globally. This is not a huge problem because you can still see the names from the output of objdump.
Debugging ARM without a Debugger 2: Abort Handlers
This is my second post in the series Debugging ARM without a Debugger.
This is an excerpt from my debugging techniques document for Real-time Programming. These techniques are written in the context of writing a QNX-like real-time microkernel and a model train controller on a ARMv4 (ARM920T, Technologic TS-7200). The source code is located here. My teammate (Pavel Bakhilau) and I are the authors of the code.
It is useful to have a simple abort handler early on before working on anything complex, like context switch. The default abort handlers that come with the bootloader spew out minimal information for gdb if lucky, or often they just hang with no message (In fact, I am now very grateful that I am able to kernel panic messages at all when things are gravely wrong with my computer). By installing an abort handler, you will be able to what went wrong in case the asserts were not good enough to catch problems earlier.
Installation
There are three interrupt vectors that need to be intercepted: undefined instruction (0x4), prefetch abort (0xc) and data abort (0x10). We can re-use one abort handler because the abort type can be read from the cpsr. One exception is that both instruction fetch abort and data fetch abort share the same processor mode. We can work around this by passing a flag to the C abort handler. The following is a sample code:
// c prototype of the abort handler
void handle_abort(int fp, int dataabort);

// the abort handler in assembly that calls the C handler
.global asm_handle_dabort
asm_handle_dabort:
    mov r1, #1
    b abort

.global asm_handle_abort
asm_handle_abort:
    mov r1, #0
    abort:
    ldr sp, =0x2000000
    mov r0, fp
    bl handle_abort
    dead:
    b dead
Because ARM has a separate set of banked registers for abort modes, the stack pointer is uninitialized. Since I wanted to use a C handler to print out messages, I need to set up a stack. In this code, I manually set the stack pointer to be the end of the physical memory (our board had 32MB RAM in total so 0x2000000 is the end of the memory). For convenience, I also pass the current frame pointer in case I want to examine the stack of the abort-causing code.
When dealing with register values directly in C, it is convenient to have the following macro to read register values:
#define READ_REGISTER(var) \
__asm volatile("mov %[" #var "], " #var "\n\t" : [var] "=r" (var))
// usage: int lr; READ_REGISTER(lr);
#define READ_CPSR(var) \
__asm volatile("mrs %[mode], cpsr" "\n\t" "and %[mode], %[mode], #0x1f" "\n\t" \
: [mode] "=r" (var))
// usage: int cpsr; READ_CPSR(cpsr);
In the C abort handler, by reading the cpsr, you should be able to figure out the current mode. Refer to ARM Reference Manual section A2.2.
The following a brief summary of the abort environment and their interpretation. The precise information can be found in the reference manual chapter A2. You should read the manual to understand the process better.
An important thing to remember is that you should do your best to ensure that your abort handler does not cause another abort inside. Again, be very conservative when dereferencing pointers.
Interpretation
Read all the values from the registers first, and then print. Otherwise, there is a chance some registers might get overwritten.
cpsr
dabort refers to the second parameter passed into the C abort handler.
|
The lower 5 bits of cpsr |
Interpretation |
|
0x13 |
You are in svc mode. It probably means your abort handler caused another abort inside. Fix it. |
|
0x17 (dataabort = 0) |
Instruction fetch abort |
|
0x17 (dataabort = 1) |
Data fetch abort |
|
0x1B |
Undefined instruction |
lr
Link Register normally contains the address to one instruction after the instruction that called the current function.
|
Current mode |
Interpretation |
|
Data fetch abort |
The abort was caused by the instruction at lr - 8 |
|
Instruction fetch abort |
The abort was caused by the instruction at lr - 4 |
|
Undefined instruction |
The abort was caused by the instruction at lr |
Fault type (in case of data/instr. fetch abort)
Read the fault type using the following code:
volatile unsigned int faulttype;
__asm volatile ("mrc p15, 0, %[ft], c5, c0, 0\n\t" : [ft] "=r" (faulttype));
faulttype &= 0xf;
|
Fault type value |
Interpretation |
|
(faulttype >> 0x2) == 0 |
misaligned memory access |
|
0x5 |
translation |
|
0x8 |
external abort on noncacheable |
|
0x9 |
domain |
|
0xD |
permission |
To see a big picture of how the fault checking works (other than misaligned memory access), you are advised to read the section 3.7 of ARM920T Technical Reference Manual. In short, unless you are making use of memory protection, you will never get domain and permission faults.
Data fault address (only applicable to a data abort)
This is the address the code tried to access, which caused the data fetch abort. Read it using the following code:
volatile unsigned int datafaultaddr;
__asm volatile ("mrc p15, 0, %[dfa], c6, c0, 0\n\t" : [dfa] "=r" (datafaultaddr));
Our actual abort handling code is located here.
Summary
It is very convenient to have a bullet-proof abort handler. It really gives you a lot more information about the problem than a hang. As well, don’t forget that most DRAM content is not erased after a hard reset, so you can use RedBoot’s dump (x) command to examine the memory, if really needed. With some effort, one can also set up the MMU to implement a very simple write-protection of the code region. Such protection could be useful to prevent the most insidious kind of bugs from occurring (Luckily, we did not have to deal with such bugs).
Debugging ARM without a Debugger 1: Use of Asserts
This is my first post in the series Debugging ARM without a Debugger.
This is an excerpt from my debugging techniques document for Real-time Programming. These techniques are written in the context of writing a QNX-like real-time microkernel and a model train controller on a ARMv4 (ARM920T, Technologic TS-7200). The source code is located here. My teammate (Pavel Bakhilau) and I are the authors of the code.
Failing fast is an extremely useful property when programming in C. For example, problems with pointers are much easier to debug if you know exactly when an invalid pointer value is passed into a function. Here are few tips for asserting effectively:
There is no such thing as putting too much asserts.
CPU power used for asserts will almost never cause a critical performance issue [in this course]. You can disable them when you know your code is perfect. Verify pointers every pointer dereference.
Assert pointers more aggressively.
Do not just check for NULLs. We know more about the pointer addresses. We know that the pointer address is limited by the size of the memory. As well, from the linker script, we can even deduce more information. For example, we know that normally, we would not want to dereference anything below the address 0x218000 because that is where the kernel is loaded. Similarly, we can figure out what memory region is text and data.
Remove all uncertainties.
Turn off interrupts as soon as possible in the assert macro. When things go wrong, you want to stop the program execution (and the trains) right away. If you do not turn off interrupts, a context switch might occur to other task and you might not be able to come back ever to stop and display what went wrong.
Print as much information as possible.
Make an assert macro that resembles printf and print as much contextual information as possible. When you have no debugger, rebooting and reproducing can be really time-consuming. 1.5 months is a very short time to build an operating system from scratch so use it wisely.
e.g. ASSERT(condition, “oops! var1:%d, var2:%x, var3:%s”, var1, var2, var3);
Example
Here’s a short snippet of ASSERT macro. It has evolved over 3 months and it looks really dirty but it works. (source)
typedef uint volatile * volatile vmemptr;

#define VMEM(x) (*(vmemptr)(x))
void bwprintf(int channel, char *fmt, ...);
#define READ_REGISTER(var) __asm volatile("mov %[" TOSTRING(var) "], " TOSTRING(var) "\n\t" : [var] "=r" (var))
#define READ_CPSR(var) __asm("mrs %[mode], cpsr" "\n\t" "and %[mode], %[mode], #0x1f" "\n\t" : [mode] "=r" (var))
void print_stack_trace(uint fp, int clearscreen);
void td_print_crash_dump();
int MyTid();

#if ASSERT_ENABLED
#define ASSERT(X, ...) { \
        if (!(X)) { \
                VMEM(VIC1 + INTENCLR_OFFSET) = ~0; /* turn off the vectored interrupt controllers */ \
                VMEM(VIC2 + INTENCLR_OFFSET) = ~0; \
                int cpsr; READ_CPSR(cpsr); \
                int inusermode = ((cpsr & 0x1f) == 0x10); int tid = inusermode ? MyTid() : -1; \
                bwprintf(0, "%c", 0x61); /* emergency shutdown of the train */ \
                int fp, lr, pc; READ_REGISTER(fp); READ_REGISTER(lr); READ_REGISTER(pc); \
                bwprintf(1, "\x1B[1;1H" "\x1B[1K"); \
                bwprintf(1, "assertion failed in file " __FILE__ " line:" TOSTRING(__LINE__) " lr: %x pc: %x, tid: %d" CRLF, lr, pc, tid); \
                bwprintf(1, "[%s] ", __func__); \
                bwprintf(1, __VA_ARGS__); \
                bwprintf(1, "\n"); /* if in usermode ask kernel for crashdump, otherwise print it directly */ \
                if (inusermode) { __asm("swi 12\n\t");} else { td_print_crash_dump(); } \
                bwprintf(1, "\x1B[1K"); \
                print_stack_trace(fp, 0); \
                die(); \
        } \
}
#else
#define ASSERT(X, ...)
#endif
That’s it for today.
Dirt-cheap Serverless Flask hosting on AWS
Update 2023-01-30: Updated the code to work with CDK 2.0
Today I want to tell you how you can host a dynamic Flask application for cheap on AWS using Serverless technologies. If you are interested in hosting a low-traffic Flask app that can scale easily, and that can be deployed with a single command for almost free, you will find this blog helpful. If you are not interested in reading why I started on this journey, feel free to skip to the overview section.
Table of Contents:
My Low-Cost Hosting Journey
As a hobbyist programmer, one of the things I've spent a lot of time thinking about is how to host a dynamic HTTPS website (including this blog) as cheaply and easily as possible. The cheaply part refers to the literal dollar cost. I wanted to spend as little as possible and not be wasteful with what I am paying for. The easily part refers to the ease of development and deployment, like being able to stand up a new website with a single command. My programmer instinct told me to do as little manual work as possible.
You might ask, why not just host a static website? I just found being able to host dynamic service code very cool, and it requires less thinking, so that's what I am focusing on here.
A Cheap VM (2015)
The first obvious choice for me was to use a cheap VM. You can get a cheap instance that can host a Flask website for less than $10/month. This is probably the popular method today due to its low barrier to entry - This is how everyone do their web programming locally, after all. There is no shortage of documentation on how to set up NGINX with your Flask application. It involves clicking a few times to get a new VM, then sshing into the instance, and then installing your software.
However, I grew pretty unsatisfied with the setup over time:
- Setting up the instance was time consuming and tedious. I tried using solutions like Ansible to automate the setup within the instance but it took a long time to test and get it right. There were many manual steps. For example, the DNS entry for the website was outside the setup script. All these manual steps had to be documented, or else I would just forget about them and would have no idea how to bring the website up again.
- It also takes a lot of effort to set up an instance that is "prod"-ready. "Production" concerns include things like rotating logs so that it doesn't fill up your disk, updating software so you don't end up running a botnet. Reading the access logs taught me that the Internet is a fairly dangerous place - you get a ton of random break-in attempts (mainly targeting PHP message boards, but there are others too).
- Since the setup was complicated, testing my change in a prod-like setting was out of question. So I just tested in prod.
- Setting up HTTPS took way more effort than I imagined. Even after letsencrypt came out, it was quite a bit of hassle to make sure certificate renewal works correctly and that the cert is not lost over instance loss. I could have slapped an ELB in front to get the certificate from AWS, but that cost $15/month so I decided not to use that.
- It was wasteful. The resource utilization was very low (single digit % CPU utilization) most of the time, which meant most of the money I paid for the instance was basically thrown away. Even the smallest unit of instances proved to be too coarse for my purpose.
- At the same time, the top end of the scaling limit was quite low. At most, the VM was able to handle a few dozen requests simultaneously. On the other hand, I couldn't find a way to make it possible to scale up, without forking at least $20 a month.
- It was really easy to lose data. So instead, I used the free tier RDS instance for a year, but it started charging $10+/month after that (I eventually moved data to DynamoDB to save cost, at the expense of re-writing some code).
ECS (early 2018)
My next attempt was to use Elastic Container Service (ECS). For those who don't know, ECS is a container orchestration engine from AWS. This was before Kubernetes became dominant like today.
Dockerizing the application meant that I was at least able to launch the instance from the ground up easily, and that if the instance is down, ECS will start it back up. I still had to setup the whole NGINX + uWSGI + Flask combo since ECS doesn't help me with that. It solved some problems but it was not any cheaper or that much simpler. It was still up to me to make sure the instances are up to date.
Adding CloudFormation to the mix (late 2018)
By the end of 2018, I've caught up with the whole Infrastructure-as-Code (IaC) thing, so I decided to migrate my ECR setup to a CloudFormation template. In case you are not familiar with it, CloudFormation (CFN) is an Infrastructure-as-Code (IaC) solution to deploy infrastructure easily. Simply put, IaC allows you to deploy your entire infrastructure like code. IaC lets you manage your infrastructure like code so you can version control it, easily rollback, and deploy your infrastructure with a single command.
This setup worked, and I was even able to make a very basic form of zero-downtime deployment work, by deploying another stack and swapping the Elastic IP between two instances. That was done outside CFN but it worked well enough. Deploying a whole new server with just a command was a cool achievement so I was proud of that.
However, it did take many, many days to get the template right. The CloudFormation template had almost no type checking. It wasn't easy to find out which fields were mandatory or not, other than by consulting the scattered documentation (it has one web page per data type... really?). The whole "edit-compile-test" iteration time was long. It took minutes for CloudFormation to tell me something was wrong, and then it took many more minutes for it to get back to the state where I could try another change.
The final CFN template was definitely something that I did not want to touch ever again, once it was working. There was also no cost-savings still.
Trying out Zappa (2020)
AWS Lambda came out in 2014, and popularized so-called "serverless" computing, also often called function-as-a-service. I'd explain Lambda like this: Lambda lets you run a function, rather than the whole operating system. A JSON event goes in, and your code runs based on that. You can call it however often as you'd like because scaling is handled by Lambda. Lambda bills for the usage in millisecond precision. If you don't use it, you don't pay for it. If you use it for a second a month, you pay for the second, not anything more than that. It's hard for me to explain how revolutionary this is - every single highlighted issue is a hard problem.
A minor bonus for hobbyists like us is that Lambda's free tier lasts forever unlike EC2 and in my opinion, pretty generous. You can host a low-traffic website for close to free, forever.
When I first heard about Lambda, I thought it would be perfect for me but I was worried about a few things: Cold-start time sounded scary, and it wasn't very obvious to me how to migrate an existing app, and the local testing story was not there, so I didn't think to use it.
Eventually in 2020, I gave it another look when I started hearing more about the benefits of Lambda and how more mature the ecosystem around it is.
My first attempt was using Zappa. It was pleasantly simple to to use and it did convince me that Lambda was way to go. However, it became apparent to me soon that it wasn't for me. Zappa was quite opaque in its operation and it didn't look like there was any integration point or an escape hatch into the rest of the CloudFormation ecosystem.
For example, I wanted to attach a CDN in front such that I can cache contents any way I want. It was not possible to do this with Zappa. Even today, the main page suggests to use something else like S3 to serve contents in conjunction with Zappa for hosting static contents.
It seemed that I had a fundamental disagreement with the project's architecture and direction. I believed this unnecessarily complicated the local testing story. I didn't agree that Flask-generated text content are somehow any less cachable. And I still don't think it's any less "serverless" to serve binary with Flask when the CDN is in front.
In summary, Zappa convinced me to go serverless but ironically, I wasn't convinced Zappa was the way to go, so I kept searching.
AWS SAM (2020)
AWS Serverless Application Model (SAM) is a tool around CloudFormation to make it easier to develop serverless Applications.
SAM does including, but not limited to the following:
- Various CloudFormation transformations that make common serverless application definitions simpler.
- Other helpers to make deployment of Lambda bundles easier for common languages (e.g., Python).
- Harness to test and execute Lambda functions locally. It will essentially parse out the CloudFormation template to setup a local Lambda environment that's similar enough.
Since the infrastructure layer is thin, I was able to setup the infrastructure around my Lambda, exactly the way I wanted. The cold start time was not bad at all - it was at worst a second which was acceptable in my opinion (tons of websites perform much poorer). Since there was a CDN in front, the cold start delays were not perceptible most of the time.
I was very pleased with this setup. It was pretty close to the Holy Grail of easy & cheap hosting. Local testing story was acceptable. Excluding the cost of a Route 53 Hosted Zone ($0.50/month), I started paying way less than a dollar per month. A single command deployment was now possible, and there was no disruption to the service.
There were things that I was still unsatisfied with this setup. Mainly, working with CloudFormation was still a big pain. I started using CFN professionally and I still didn't like it. In addition, I didn't see SAM adopted widely, so it wasn't so easy to Google problems with using it. In other words, it was not something I'd recommend to a friend, unless they were willing to spend a lot of time going through the same pain I went through with multiple days of trial-and-error around the infrastructure.
Meet CDK (2021)
Finally, this year I gave CDK a try this year, and I was immediately sold on it. Cloud Development Kit (CDK) improves the CloudFormation experience significantly. It makes CloudFormation so much better that I would always recommend using CDK to define infrastructure, no matter how small your project is.
CDK is essentially a typed CloudFormation template generator. CDK supports writing the infrastructure definition in TypeScript (among many other languages, but please, just use TypeScript - it's not so hard to pick up). That means you get all the usual benefits of typed languages like earlier validation of errors, auto-complete and navigation support in IDEs like Visual Studio Code out of the box. It still generates (synthesis in the CDK parlance) a CloudFormation template at the end of the day so you will have to know a little bit about how CloudFormation works but that's not hard.
Migrating from the raw CloudFormation template was fairly simple because CDK can even import your CloudFormation template into a CDK app. After importing it, it was just a matter of moving one construct at a time to CDK. Unlike in CloudFormation template, referring to an existing resource in CDK was also fairly trivial. It took me less than a day to migrate the whole thing.
This was it, I finally had something good - something I can recommend to a friend. In fact, this blog you are reading is hosted using this exact setup.
SAM still had a place in the CDK world because it can be used to emulate Lambda locally based on the CDK-generated CFN template, if necessary. However, I rarely ended up using it once I got the infrastructure setup such that the local execution environment matches the remote environment.
Overview of the Holy Grail
For the rest of the blog, I want to explain how the Holy Grail is put together. I made a runnable starter kit available on GitHub so you can clone and host your own Serverless Flask on AWS easily. I'll include links to code in the post so you can refer back to the actual code.
We are going to use the all the components discussed previously: CDK, CloudFormation, Lambda, API Gateway, CloudFront CDN and S3. Here's a diagram of how they relate to each other.

Let's start from Lambda, since that's where the code runs.
Lambda
Defining Lambda in CDK is pretty straightforward. The following sample shows how it can be done:
let webappLambda = new lambda.Function(this, "ServerlessFlaskLambda", {
  functionName: `serverless-flask-lambda-${stageName}`,
  code: lambda.Code.fromAsset(__dirname + "/../build-python/",),
  runtime: lambda.Runtime.PYTHON_3_9,
  handler: "serverless_flask.lambda.lambda_handler",
  role: lambdaRole,
  timeout: Duration.seconds(30),
  memorySize: 256,
  environment: {"JSON_CONFIG_OVERRIDE": JSON.stringify(lambdaEnv)},
  // default is infinite, and you probably don't want it
  logRetention: logs.RetentionDays.SIX_MONTHS,
});
(link to code in the starter kit)
By using lambda.Code.fromAsset, you can just dump your self-contained Python environment and let CDK upload it to S3 and link it to Lambda automagically.
There are two more main problems we need to tackle before we can actually host a Flask app. First, Lambda doesn't speak HTTP so something else needs to convert HTTP into a JSON event. Second, since Flask app doesn't speak the JSON object, somebody also needs to translate the JSON event into something Flask understands. Using API Gateway and apig-wsgi, I was able to solve both problems nicely.
API Gateway
API Gateway is a fairly complex product. I, myself, am not sure how to explain it. In any case, API Gateway is frequently used to give Lambda an HTTP interface, so the CDK module for API Gateway already provides a construct called LambdaRestApi. The following is all you need to define the API Gateway for the Lambda:
let restApi = new agw.LambdaRestApi(this, "FlaskLambdaRestApi", {
  restApiName: `serverless-flask-api-${stageName}`,
  handler: webappLambda, // this is the lambda object defined
  binaryMediaTypes: ["*/*"],
  deployOptions: {
  throttlingBurstLimit: MAX_RPS_BUCKET_SIZE,
  throttlingRateLimit: MAX_RPS
  }
});
(link to code in the starter kit)
The binaryMediaTypes is set to all types such that it simplifies handling of all content types.
throttlingBurstLimit and throttlingRateLimit are one of the simplest ways I've seen to apply a token-bucket style throttling to your web app. It also serves as a control to protect yourself from an unwanted billing disasters.
apig-wsgi
The LambdaRestApi object from the previous section takes a HTTP request and hands it over to the Lambda. But Flask doesn't understand this particular format, which speaks Web Server Gateway Interface (WSGI) only. Fortunately, there is a Python library named apig-wsgi that can convert the API Gateway-format into WSGI and vice versa. The library is very simple to use, you simply need to wrap the Flask app with it. In the following code, create_app is the function that creates your Flask app.
from apig_wsgi import make_lambda_handler
from serverless_flask import create_app

inner_handler = make_lambda_handler(app, binary_support=True)

def lambda_handler(event, context):
  return inner_handler(event, context)
(link to code in the starter kit)
CloudFront
I suggest fronting the API with CloudFront, which is a Content Distribution Network (CDN) service by AWS. It has two main purposes. First, when you create an API Gateway-backed API, your application root is always prefixed by the stage name (e.g., /prod). CloudFront can re-write the URL to provide a clean URL (/my-url to /prod/my-url). Second, it can improve your application performance by being closer to your users and caching responses. The following code snippet assembles a simple CloudFront CDN. This is by far the longest CDK snippet:
let cdn = new cloudfront.Distribution(this, "CDN", {
  defaultBehavior: {
    functionAssociations: [{
      eventType: cloudfront.FunctionEventType.VIEWER_REQUEST,
      function: new cloudfront.Function(this, "RewriteCdnHost", {
        functionName: `${this.account}RewriteCdnHostFunction${stageName}`,
        // documentation: https://docs.aws.amazon.com/AmazonCloudFront/latest/DeveloperGuide/functions-event-structure.html#functions-event-structure-example
        code: cloudfront.FunctionCode.fromInline(`
        function handler(event) {
          var req = event.request;
          if (req.headers['host']) {
            req.headers['x-forwarded-host'] = {
            value: req.headers['host'].value
            };
          }
          return req;
        }
        `)
      })
    }],
    origin: new origins.HttpOrigin(restApiUrl, {
      originPath: "/prod",
      protocolPolicy: cloudfront.OriginProtocolPolicy.HTTPS_ONLY,
      connectionAttempts: 3,
      connectionTimeout: Duration.seconds(10),
      httpsPort: 443,
    }),
    smoothStreaming: false,
    viewerProtocolPolicy: cloudfront.ViewerProtocolPolicy.REDIRECT_TO_HTTPS,
    cachedMethods: cloudfront.CachedMethods.CACHE_GET_HEAD_OPTIONS,
    allowedMethods: cloudfront.AllowedMethods.ALLOW_ALL,
    compress: true,
    cachePolicy: new cloudfront.CachePolicy(this, 'DefaultCachePolicy', {
      // need to be overriden because the names are not automatically randomized across stages
      cachePolicyName: `CachePolicy-${stageName}`,
      headerBehavior: cloudfront.OriginRequestHeaderBehavior.allowList("x-forwarded-host"),
      // allow Flask session variable
      cookieBehavior: cloudfront.CacheCookieBehavior.allowList("session"),
      queryStringBehavior: cloudfront.CacheQueryStringBehavior.all(),
      maxTtl: Duration.hours(1),
      defaultTtl: Duration.minutes(5),
      enableAcceptEncodingGzip: true,
      enableAcceptEncodingBrotli: true
    }),
  },
  priceClass: cloudfront.PriceClass.PRICE_CLASS_200,
  enabled: true,
  httpVersion: cloudfront.HttpVersion.HTTP2,
});
new CfnOutput(this, "CDNDomain", {
  value: cdn.distributionDomainName
});
(link to code in the starter kit)
Most of the configuration is self-explanatory, but there are a few things that need explanation: domain re-writing and cache control.
Domain re-writing
Domain re-writing is implemented so that Flask can know to which domain it's serving the content. This is important if your Flask app needs to know its own domain for things like sub-domain support and absolute URL generation. If you are hosting Flask in a more traditional architecture, this is not an issue but in this case, we are going through CloudFront and API Gateway so it's a bit more involved.
CloudFront is capable of passing the Host header but this is not possible when using API Gateway in the middle because API Gateway uses the Host header to distinguish its clients. (Googling this suggests this to be a common problem).
If you simply pass through the Host header, you will get a mysterious 403 error from API Gateway (most like this is because they use SNI to differentiate different originating domains).
Fortunately, we can use a super cool feature named CloudFront Functions to solve this problem. CloudFront Functions lets you give the CDN a JavaScript function which can modify the request and response objects at will, so long as they finish in a millisecond. In our setup, the function code will rename the original Host header into x-forwarded-host. We also need to allow the specific header to be forwarded.
Since the Flask application doesn't really know about the x-forwarded-host, we need to re-write the header once more to restore the Host header:
def lambda_handler(event, context):
  app.logger.debug(event)
  headers = event['headers']
  cf_host = headers.pop("X-Forwarded-Host", None)
  if cf_host:
    app.config["SERVER_NAME"] = cf_host
    # patch host header
    headers['Host'] = cf_host
    event['multiValueHeaders']['Host'] = [cf_host]
    app.logger.info(f"Host header is successfully patched to {cf_host}")

  return inner_handler(event, context)
(link to code in the starter kit)
Note that the HTTP header casing is inconsistent - CloudFront only accepts lower-case HTTP header names in the configuration but API Gateway turns them all into Camel-Kebab-Case headers.
After this, the Flask application will work pretty seamlessly with respect to the Host header.
Cache Control
The sample CDN configuration caches responses for 5 minutes by default, up to an hour. This is a sensible default for a mostly static website, but there are times when you don't want the response to be cacheable.
Since CloudFront CDN simply follows the HTTP cache directives, you can use the same mechanism to prevent caching of resources.
from flask import make_response
import time

@app.route("/example_json_api")
def example_json_api():
  resp = make_response({"body": "ok", "time": round(time.time())})
  resp.headers["Content-Type"] = "application/json"
  return resp

@app.route("/example_json_api_no_cache")
def example_json_api_no_cache():
  resp = make_response({"body": "ok", "time": round(time.time())})
  resp.headers["Content-Type"] = "application/json"
  resp.headers["Cache-Control"] = "no-store, max-age=0"
  return resp
You can observe that the first resource is cached for 5 minutes whereas the second resource is always fetched from the source by examining the time field.
The current configuration passes through a cookie named session because that's what's used by Flask to store session data. This effectively disables caching if you start using session (e.g., for logged in users). For a more robust control (such as always caching images regardless of cookies), you will want to create new CloudFront behaviours based on the URL.
Session Handling
This section is only relevant if you are planning to use the Flask session.
Session refers to the state that gets persisted across HTTP requests that the client cannot tamper with. For example, one of the ways to implement the "logged in" state is to use a session variable to indicate the current user name. A typical way this is implemented is by storing the session in a database.
It is possible to also implement the session without a database if you utilize cryptography (with a different set of trade-offs). This is the approach Flask takes by default (Flask quick start section on session). What is relevant in our context is that, you need to securely store the secret key backing the session encryption. If you were to re-generate the secret key every time, the session would not work.
In my setup, I decided to use S3 to store the key. You could use Secret Manager but it is totally not aligned with our goal of minimizing cost.
Here's how to define the S3 bucket in CDK:
let appStore = new s3.Bucket(this, "S3Storage", {
  blockPublicAccess: BlockPublicAccess.BLOCK_ALL,
  removalPolicy:RemovalPolicy.RETAIN,
  encryption: BucketEncryption.S3_MANAGED,
  bucketName: `${this.account}-serverlessflask-s3storage-${stageName}`
});

// grant permissions to the Lambda IAM Role
appStore.grantReadWrite(lambdaRole);
(link to code in the starter kit)
In the code, I opted to simply create a new secret key, if it does not exist - the code is not free of race-condition but it's good enough for our purposes.
Incident Response Plan - if the key ever gets compromised, you can just delete the S3 object and you will get a new key.
Wrapping Up
Feel free to try this yourself with the runnable example code in my serverless-flask-on-aws Github repo. I tried making the sample as realistic as possible - it has simple unit tests samples along with a very detailed documentations on how to run it.
If you found this helpful, please share with your friends using the permalink. Feel free to tweet at me or email me, if you have any comments.
Cost (Update 2021-12-30)
Only_As_I_Fall on Reddit asked how much this costs. This was my answer:
Since this is a mostly static website, I'll assume there aren't that many hits all the way to Lambda - which means the CDN is the dominating factor (Lambda+API Gateway would not cost much). As of now, loading the main page (with 5 latest article) costs about 120kiB per page load, but after compression it's 50KiB. Let's assume it's all not cached. So 1GiB gives me 20,000 hits. I opted for the "price class 200" which can be up to $0.120/GiB.
CloudFront now gives 1TiB for free, so it's free up to 20 million hits per month or 7.9 requests per second flat (as a comparison, reddit gets just 80x more than that). After that, it's about $6 per a million visits.
ddb-local - Python wrapper for DynamoDBLocal
While working on a Python project, I wanted to write some tests that interact with Amazon DynamoDB.
After a bit of searching, I found that there is an official Local version of DynamoDB. This is cool, I thought. Reading the instruction made me realize, though, that none of the options suit my use case particularly well.
The docker version was technically "standalone" but it was not something I can integrate into a unit test harness easily. The Maven version was the closest to what I was looking for but this was not usable for a Python application.
Finally, the tarball version looked promising but it still had a number of annoyances: First, it had to be downloaded and installed somewhere. And then you'd need to start the database process as part of your test and terminate it properly when your test is done.
What I really wanted was to be able to write something like this:
import pytest
from ddb_local import LocalDynamoDB

# Creates a throw-away database
@pytest.fixture
def local_ddb():
    with LocalDynamoDB() as local_ddb:
        yield local_ddb

# Write a test using the temporary database
def test_with_database(local_ddb):
    ddb = boto3.resource("dynamodb",
                         endpoint_url=local_ddb.endpoint)
    # do something with ddb
I couldn't find anything that resembles this, so I decided to roll up my sleeves and write it myself. It took me about a day but I was able to write something presentable. I gave it a very logical name, too: ddb-local.
The library does everything I want - it handles the database installation, and it gives a Python-friendly interface.
Prerequisite
One thing you will have to do is to install Java yourself. This is because installing Java is simple for the end users but not for the library.
For example, on Ubuntu 20.04, you can run this command to install the latest Java:
sudo apt install -y openjdk-17-jdk
Using it in your Python code
To start using it, you can run one of the following commands, depending on your needs:
# Install globally (not recommended), or install inside a virtualenv.
pip install ddb-local
# Install for your user only.
pip install --user ddb-local
# Using pipenv, install as a dev dependency.
pipenv install -d ddb-local
The library handles the installation of the latest Local DynamoDB binary for you. It will also manage the process for you. You can simply use the context manager idiom (i.e., with LocalDynamoDB as ddb) to start the database, and to ensure it shuts down when you are done with it.
Usage Examples
pytest
Pytest is a popular testing framework in Python (it's also my favorite framework). Since this was my main motivation, the code I wanted to write works as-is 😉
import pytest
from ddb_local import LocalDynamoDB

# Creates a throw-away database
@pytest.fixture
def local_ddb():
    with LocalDynamoDB() as local_ddb:
        yield local_ddb

# Write a test using the temporary database
def test_with_database(local_ddb):
    ddb = boto3.resource("dynamodb",
                         endpoint_url=local_ddb.endpoint)
    # do something with ddb
Basic Persistent Database
import boto3
from ddb_local import LocalDynamoDB

with LocalDynamoDB() as local_ddb:
    # pass the endpoint.
    ddb = boto3.client('dynamodb', endpoint_url=local_ddb.endpoint)
Without a Context Manager
If you can't use it with a context manager, you can also call start() and stop() manually. In this case, it's your responsibility to make sure stop() is called.
from ddb_local import LocalDynamoDB

db = LocalDynamoDB()
db.start()
print(f"Endpoint is at {db.endpoint}")
db.stop()
Other Escape Hatches
I am a big believer in providing escape hatches in libraries and this library is no exception.
Here are some of the constructor options that also serve as "escape hatches":
extra_args: If you'd like to specify an option supported by DynamoDBLocal that is not supported by the library, you can pass it using this argument.unpack_dir: If you'd like to provide your own tarball, you can install the DynamoDBLocal yourself, and the just point to the root of the directory.debug: Pass through the output from the underlying process.port: Use a different port than the default port.
Wrap-up
You can find the source code at Github. It's licensed in MIT, so you can use it for whatever purpose you want. It would be nice if you let me know if you found it useful 😀
Offline App Usability Checklist
I started paying attention to offline usability because I was fed up with apps that have really bad offline usability issues.
Living in Toronto, whenever I wanted to use my tablet/cellphone to read something, I am often at a location with no connectivity. For example, I commute daily on TTC Subway and there is no connectivity underground. All food courts I go for lunch have no cell service, either. I get to experience all kinds of good and bad offline support in apps as a result.
When I say 'offline usability', it does not have to be about an app that supports offline mode. Apps with intrinsic online requirements can also have bad offline usability issues (look at the section "Bad Refresh Behaviour"). I would be happy if people read this post and think a bit more about this problem.
Determine the Requirement
You need to determine what needs to work offline versus what does not. There is no point supporting offline mode for something that intrinsically requires connectivity. The requirement highly depends on the kind of application you are building. Here are a few examples:
Email App
Email apps are perhaps the oldest and most mature of all offline capable apps. It has been there since the dial-up days, when always-on connectivity wasn't a common thing.
What data is available offline
Recent emails in Inbox and other specified folders.
What can User do when offline
- User can view offline emails, and attachments depending on the settings.
- User can send an email. The email will be saved in Outbox, and the email will be sent when it is online.
- User can view/delete items in synchronized folders. User can edit items in Drafts and Outbox folder. The action will be propagated to server when it's online.
What settings can User change
- How much to synchronize: 3 days, 5 days, 2 weeks, a month, and all
- How often to synchronize: push, every 5 min, ..., once a day, and never
- What folders to synchronize: Inbox, Outbox, Sent, and other folders
News Reader
What data is available offline
Recent news (e.g., news in the last 24 hours) which is synchronized at some interval.
What can User do when offline
- User can read recent news. Users can look at images attached to news articles.
- User can share the link to social networks, which will be sent when online.
What settings can User change
How often to synchronize: every hour, 3 hours, 6 hours, every day, or never.
What not to do
Here is a list of common offline usability issues. This list is not inclusive.
Incomplete Data
The data available offline must be as a whole and useful form regardless of its internal data structure.
For example, consider a Contact app that only caches list of contact names and not their phone numbers because they are in different database table (or whatever reasons). Not only the contact names are useless to the user, it is frustrating to the user because the app gave a false impression that contacts are available offline. Most importantly, the app probably ruined the user's business for the day.
In this case, it would have been better to cache all of user's contacts and its related information. It is very unlikely that the data won't fit on a modern smartphone. In the unlikely case of too many contacts, we could consider a concept of 'favourites' to synchronize.
Unpredictable Caching
Algorithms like MRU (Most Recently Used) may work for many things but it is largely inappropriate for caching offline user data (unless your user research tells you so). People just don't remember a list of things recently accessed. There are simply too many factors in play to guess what the user needs offline.It is best to have caching rules that are reliable and that humans can easily understand (e.g., none, last n days, all). Obviously, the content should be complete (see the section "Incomplete Data" above).
Bad Refresh Behaviour
This one applies to always-online application as well. Refresh should not invalidate the cache until a successful response has come back.Here is an example of a bad refresh behaviour on Facebook for Android: One morning, I opened up a friend's long status that I wanted to read but I had to leave for work. So I just turned off the screen of my tablet and got on the subway. The moment I turn on the screen, Facebook's refresh on unlock logic kicks in, and blew up the status I wanted to read.
Another bad example is the Korean news portal Naver (news.naver.com). It does a periodic page refresh through location.reload(). If you lose internet connection for 30 minutes, you will find that all Naver news tabs turn into error pages.
Defying Users' Expectation on Online Requirement
Apps should respect User expectations and mental model on whether particular function should be available offline.For example, Users will not accept an email app that requires connectivity for writing a new email. Users of an email app expects the app to save the new email and send it whenever the connectivity is restored.
Shazam is a good example of an app that respects this principle. Shazam listens to a song and finds out what the song is for the user. When there is no connectivity, Shazam listens to a song and saves the recorded sound locally. When the connectivity is restored, Shazam sends and tags the saved sound.
Data Loss from Conflict Handling
Losing or overwriting data without user's consent is probably one of the worst things you can do in information systems.Suppose two users edited a contact, offline. When they come back online, the second save will cause a conflict. It is best if there is a contact merge tool. If there is not one, or if it is too hard to write one, the server could save the second saved contact as a new contact and let the user merge it manually. Just never overwrite the first edit, or lose the second edit.
Conclusion
Designing usable apps for offline use is not easy. You have to decide what needs to be available offline, and how & when to synchronize them. Offline requirements often have huge architectural implications, as well. Therefore, it is important to keep these items in mind at all stages of software development, from design to implementation and maintenance.
Recent posts
Categories
Search